FREE DELIVERY - ON ORDERS OVER $95
Master the Art of Wall Painting: Expert Tips for Flawless Results
Painting your walls is undoubtedly the easiest way to freshen up your interior. Whenever DIYers have a limited budget often their instinct is to opt for cheaper paints, brushes and rollers. Unfortunately, this approach leads to an inferior final result and takes much longer to finish.
Many DIYers have learnt the hard way, getting frustrated with picking off brush bristles from walls followed by doing the same with lint from inferior rollover covers. The Paint Pot Pro® Essential Premium Painting Tools prevent this type of heartache.
YOUR ESSENTIALS PAINTING TOOLKIT
Everything you need for your painting task is shown in the list below. You can find most of these products on paintpotpro.com.au
- Drop cloths
- Paintbrushes 1x cutting brush and 1x sash brush ESSENTIALS RANGE Pro Brush Pack
- Paint rollers 1x mini paint roller 1 x large roller
- Aluminium telescopic extension pole for the paint roller
- Paint tray
- Sandpaper (fine & medium grit)
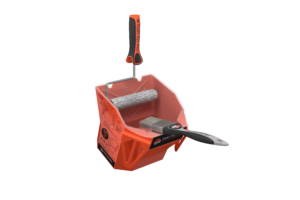
- Paint Pot Pro® – the ultimate painter’s aid
- Painter’s low tack washi tape
CLEAN AND REPAIRED WALLS
Remove dust, cobwebs, and dirt – remember to get into the corners of walls to ceilings. Be patient and use sugar soap where required to clean stubborn areas. Keep a fine-grit sandpaper (240 grit) folded in your pocket as you may come across particles such as large dust stuck within the old paint. Gently sand those off.
PRIMER FOR SMOOTH APPLICATION
This step may seem like an additional cost, but a primer improves the paint’s adhesion and helps block the previous colour from bleeding through. Doing this will also reduce the amount of paint needed for painting a wall. If your walls are of fresh plaster, then a primer is very important.
Another tip to buying a primer is to tint it with a shade that is similar to your final paint colour, this will add to a premium finish.
IDENTIFY MOULD
If there is mould on ceilings and walls then use sugar soap to remove affected areas. If you are concerned that mould is an issue then a great tip is to mix in anti mould solution into your paint. Seek advice from your local paint store specialist to help with the ratio to volume of paint you will need.
CRACKS FINE & WIDE
Fine cracked walls can be filled with a regular filler (check for drying times on packing), then sand using a fine grit sandpaper (180-240 grit). If your walls have larger cracks, ensure that you remove flaking edges. If you need to make these cracks a little larger to remove the loose or flaky edges, that’s ok.
We recommend the following 3-step process when the large crack is ready for repair.
- Use a “jointing” tape over the crack and apply a joint compound plaster as your 1st coat. Wait till dry and then sand using a 180-grit medium sandpaper.
- Coat the sanded compound plaster using a skim coat filler. Wait till dry and sand using a 240-grit fine sandpaper.
- Be sure that these surfaces are dust free before painting.
REMOVE LIGHT SWITCH COVERS
This simple step allows you to get close whilst cutting in with no paint on the light switch!
FIGURE OUT THE AMOUNT OF PAINT NEEDED
Buy the right amount of paint, a little leftover is fine – it may come in handy later and often does! If budget permits go for quality paints that are longer lasting and require fewer coats. A rough estimate is to buy 3.8 litres for every 37 square metres.
Don’t paint directly from the paint tin. Pour into pots or trays and reseal the paint tin. You will protect your paint from drying out and prevent airborne particles and unclean brushes from damaging the quality.
Pour the paint directly into the Paint Pot Pro®, the best and safest way for the brush or roller to soak up paint.
GET STARTED – STOP PROCRASTINATING!
We hope these ideas and tips help you with your renovation and inspire you to get started. Good luck!